OXI EVO Pellet Burner
Table of Contents
- Description and Function
- Requirements to the Fuel
- Scope of Supply
- Design and Operational Features
- Burner Technical Specifications
- Overall and Mounting Dimensions of the EVO Model Range
- The Burner Installation
- Electrical Schematic Diagram
- Manufacturer Settings. Basic parameters
- Start-up and Shutdown
- Main Operating Modes
- Basic Arising Problems
- Requirements for the Safe Operation
- Burner Checkout
- Disposal of the Burner at the End of its Service Life
1. Description and Function
EVO series burners are designed to combust solid fuel in the form of pellet grains with varying degrees of contamination and grain sizes (granulometric composition and other requirements to the fuel are described in Section 2). The burner is operated automatically without the need for constant monitoring and presence of the personnel. Movable grate bars of the OXI burner prevent the slag generated during pellet grains combustion from sticking to the walls of the combustion chamber. The slag is moved forward and out of the combustion chamber by the cyclic forward motion of the grate bar grasses group. Combustion of both highquality fuel and agro pellets is significantly improved due to the ceramic coating of the combustion chamber. Selfsustaining combustion is ensured by a uniform air supply from under the grate bar grasses with preliminary separation into primary and secondary combustion air.
The burner is designed to be operated in central heating boilers on solid fuel, as well as on some gas-fired boilers the design of which supports maintenance of the boiler heat exchanger.
The burner is a device not disruptive to the ecological balance of the planet ecosystem. Environmental neutrality is ensured by the use of fuel from the renewable energy sources. At the same time, the burner operation consumes minimal electrical energy. The burner is regulated by the controller adjusted by the user and responsible for the optimum values of the operating parameters, such as: fuel dosage, control of the combustion air, flame brightness, boiler temperature, etc. The burner controller is specifically designed to control a complex of heating system composed of solid fuel boilers with pellet burners and basic automatic control units (e.g. a room thermostat). The burner controller is additionally equipped with a boiler and DHW temperature sensors. The controller can be connected to the control pumps, as well as to GSM alarm unit.
The controller operation algorithm provides for such emergency situations as overheating, sudden extinguishing of the flame or unplanned depletion of fuel reserves in the burner fuel hopper. Automation system of the burner is resistant to both short-term and long-term sudden power outages. The burner design provides for the possibility of after-combustion of fuel dosage in the de-energized combustion chamber without impacting both the design elements of the burner itself and the boiler equipment.
The dosage and feeding of the pellet grains is provided by a spiral conveyer included in the standard delivery package from a special container, i.e. a pellet hopper, which in its turn can be purchased optionally. The conveyor design provides for installation into an arbitrary hopper with different relative location in the boiler room. Note: this may require certain modifications to the hopper. To this end, the spiral conveyers are optionally available in different lengths.
The burner maximum efficiency is only reached with the proper quality fuel pellet grains. Specifications of such pellets are presented in Section 2.
2. Requirements to the Fuel
This burner efficiency is guaranteed with the following raw wood pellet grains:
|
Parameter
|
Value
|
|
Diameter
|
6 – 8 ± 1, mm
|
|
Length
|
6 – 60, mm
|
|
Packed density
|
650 ± 100 kg/cubic meter.
|
|
Specific calorific efficiency
|
14.5 – 19 MJ/kg
3,460– 4,540 kcal/kg
|
|
Humidity
|
≤ 10%
|
|
Ash content
|
≤ 5%
|
|
Dustiness
|
≤ 3%
|
The burner rated capacity is stated under the condition of operation on the pellet grains manufactured in accordance with ENplus standard. For the pellet grains with different values of caloric content, ash content or moisture content, the burner rated capacity will differ, towards the reduction in the capacity.
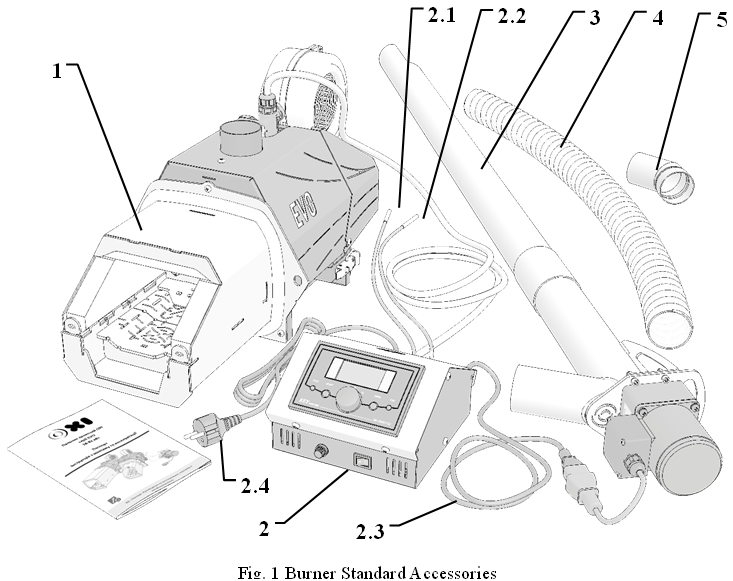
3. Scope of Supply
|
|
Standard Accessory
|
|
No.
|
Component
|
|
1.
|
OXI EVO series Burner
|
|
2.
|
OXI / KEY / Plum controller. Minimum accessory:
|
|
2.1
|
Boiler temperature sensor
|
|
2.2
|
Feeder overheating sensor
|
|
2.3
|
Spiral conveyer connection cord
|
|
2.4
|
Power cord
|
|
3.
|
Fuel feeding spiral conveyer. Standard length is
1.5 m with optional extension of up to 3 m
|
|
4.
|
Flexible hose made of fusible polymer in 1m length. For connection of the burner elbow to the spiral conveyer
|
|
5.
|
Burner elbow. 360° rotatable
|
|
Optional Accessories
|
|
No.
|
Component
|
|
6.
|
Fuel feeding spiral conveyer of the required length and capacity
|
|
7.
|
Pellet hopper is a storage of the required dimensions and capacity
|
|
8.
|
Fusible corrugated hose of the required length.
|
|
9.
|
Automatic electronics (GSM module, etc.)
|
|
10.
|
Boiler doors, both new and modification of the existing ones
|
OXI EVO series burners are supplied as standard, which enables installation of the burner into the boiler, its configuration and maintenance in the standard mode. Additional accessories are optionally available to extend the burner functionality.
|
8
|
Linear grate bar cleaning drive
|
|
9
|
Air distribution control system
|
|
10
|
Electrical switching unit
|
|
11
|
Flame sensor
|
|
12
|
Automation system connection socket
|
|
13
|
Burner casing
|
|
14
|
Stationary grate bar
|
|
15
|
Igniter replacement manhole
|
|
16
|
Flexible screw-shaped scroll
|
|
No.
|
Component
|
|
1
|
Combustion chamber (two options)
|
|
2
|
Grate bar grass
|
|
3
|
Combustion chamber ceramic coating
|
|
4
|
Ceramic fuel igniter
|
|
5
|
Combustion air pressurizer fan
|
|
6
|
Combustion chamber feeder
|
|
7
|
Burner housing
|
4. Design and Operational Features
Fig. 2 OXI EVO Series Pellet Burner Construction Diagram
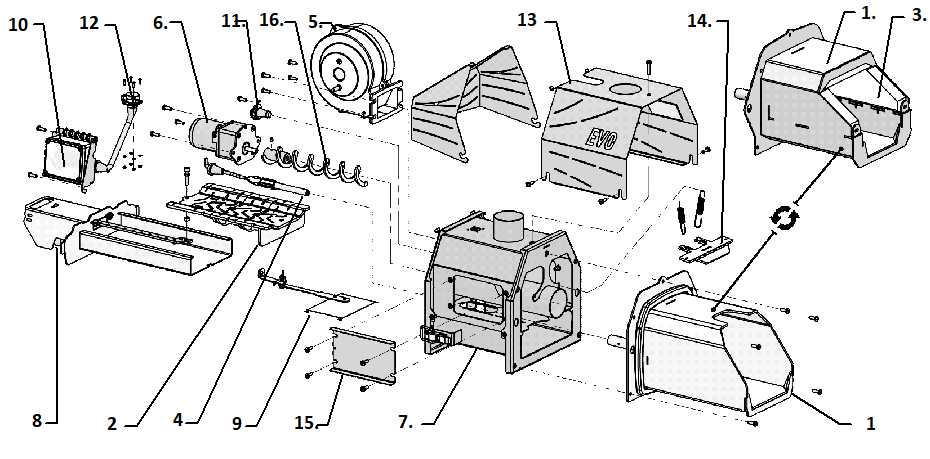
OXI EVO series burner is assembled from individual components into a complete modular multifunctional device.
The burner operation is initiated with the intake of pellet grains from the storage hopper by the screw-shaped scroll. The scroll is driven by the spiral conveyer drive, pulling the pellet grains into the spiral conveyer pipe cavity and then conveying it to the discharge opening. The spiral conveyer drive is regulated by the controller and is capable of operating in various modes, alternating between operation and downtime. This is how a dosage of fuel of a particular mass is formed. Then the pellet grains are freely poured out. The pellet grains passing through the fusible hose and the burner elbow fall by gravity into the feeder 6 cavity, which advances a portion of fuel directly into combustion chamber 1 on grate bar grass 2.
This is followed by activation of ceramic igniter 4 (spark lighter), operated in conjunction with fan 5. In the ignition mode, the fan supplies a limited amount of air, which is quickly heated to the high temperatures by the igniter (the temperature of the spark lighter operating surface is approximately 1,000°C). The heated air affecting the pellet grains causes their spontaneous combustion.
Once the flame of sufficient brightness is detected by photo sensor 11, the automatic equipment switches the burner into the ignition stabilization mode. In this case, the ceramic igniter is disabled and the amount of air and fuel fed to the burner is smoothly increased until the maximum capacity mode is reached.
Combustion chamber 1 is made of heat-resistant AISI 310S steel and is designed for long-term operation at temperatures of up to 1,150˚С. The size dimensions and location of the openings on grate bar 2 ensure stable combustion in the burner, as well as the best combustion efficiency and minimum thermal deformations of the grate bar grass.
The ceramics design of combustion chamber 3 enhances combustion efficiency, resulting in cleaner combustion as compared to the burners designed with cooled metal combustion chamber housing.
However, in the cases when low quality pellets with low ash melting point or agro pellets are used for the burner operation, high temperatures in the burner combustion chamber can cause sintering of some of the
|
Minimum capacity, kW
|
18
|
37
|
67
|
|
Supply voltage, V/Hz
|
230/50
|
|
Average power consumption, W
|
48
|
|
Ignition power consumption, W
|
407
|
|
Total length, mm
|
601
|
636
|
671
|
|
Total height, mm (excluding elbow)
|
341
|
|
Total width, mm
|
273
|
|
Combustion chamber height, mm
|
139
|
160
|
180
|
|
Combustion chamber width, mm
|
142
|
162
|
182
|
|
Combustion efficiency
|
>98%
|
|
Achievable boiler efficiency
|
<92%
|
|
Smooth power modulation
|
Yes
|
|
Complete with fuel spiral conveyer (1.5 m)
|
Yes (Ø70 mm)
|
|
Complete with fusible corrugated hose
|
Yes (1 m)
|
|
Peak under pressure in the boiler, Pa
|
20
|
|
EVO series burner weight, kg
|
18
|
21
|
24
|
|
Fuel spiral conveyer weight, kg (1.5 m)
|
11
|
ash into quite solid particles. Such particles can significantly reduce the burner autonomous operating time without the need for intervention and cleaning. Batch action linear drive 8 is provided, and part of the grate bar grass is manufactured movable in the burner design to eliminate the negative effects caused by the use of low-quality pellet grains. Under the control of the automation, the linear cleaning drive brings the grate bars in operation with a certain regularity, which is best suited to a given quality fuel and ensures the burner maximum possible autonomous operating time, even when operating on agro pellets.
|
Parameter
|
Model
|
|
Ec14
|
Ec16
|
Ec18
|
|
Rated capacity, kW
|
26
|
52
|
82
|
|
Minimum capacity, kW
|
18
|
37
|
67
|
|
Supply voltage, V/Hz
|
230/50
|
|
Average power consumption, W
|
48
|
|
Ignition power consumption, W
|
407
|
|
Total length, mm
|
601
|
636
|
671
|
|
Total height, mm (excluding elbow)
|
341
|
|
Total width, mm
|
312
|
|
Combustion chamber height, mm
|
169
|
190
|
210
|
|
Combustion chamber width, mm
|
201
|
221
|
241
|
|
Combustion efficiency
|
>98%
|
|
Achievable boiler efficiency
|
<92%
|
|
Smooth power modulation
|
Yes
|
|
Complete with fuel spiral conveyer (1.5 m)
|
Yes (Ø70 mm)
|
|
Complete with fusible corrugated hose
|
Yes (1 m)
|
|
Peak under pressure in the boiler, Pa
|
20
|
|
EVO series burner weight, kg
|
22
|
25
|
29
|
|
Fuel spiral conveyer weight, kg (1.5 m)
|
11
|
Burners operation experience suggests that when changing the fuel to low-quality pellets where the burner was operated on high-quality pellets with high efficiency for a long time, high-quality combustion on the burners of classic design is not always possible to be achieved. For this reason, air distribution controller 9 has been integrated into the design of the OXI EVO series burner, which provides a wide range of air dosages supplied to different combustion zones. Thus, the maximum efficiency of combustion of different fuels with significantly different properties can be achieved in a single burner.
Burner housing 7 also incorporates electrical switching unit 10. Housing cover 13 encloses the burner housing protecting it from damage and external impact on the burner components.
The spiral conveyer provides a measured fuel feed to the burner. The spiral conveyer is operated by the controller. The spiral conveyer is connected to the burner with a low-melting corrugated hose protecting the pellet storage area from the effects of the inverted flame.
The burner is designed with the following successive fire safety levels in emergency modes:
- Movable grate bars prevent accumulation of the unburned pellet grains in the combustion chamber.
- The feeder forms a gap in the fuel jet and ensures a rhythmic feeding of the fuel dosage into the combustion zone.
- Stocker volume pressurization prevents the flame jet from expanding into the fuel line.
- An overheat sensor is provided on the burner elbow to alert of a potential fire.
- As the last of protection level, the fusible corrugated hose melts and prevents flames from spreading towards the fuel storage area.
5. Burner Technical Specifications
|
Parameter
|
Model
|
|
E14
|
E16
|
E18
|
|
Rated capacity, kW
|
26
|
52
|
82
|
The burner rated capacity is stated under the condition of operation on the pellet grains manufactured in accordance with ENplus standard. For the pellet grains with different values of caloric content, ash content or moisture content, the burner rated capacity will differ, towards the reduction in the capacity.
|
Part Number
|
sX, mm
|
sD,
mm
|
sd,
mm
|
sK, mm
|
sL, mm
|
Burner capacity, kW
|
|
ШК3GN100K-70-601500
|
1,430
|
70
|
60
|
150
|
1,61 5
|
18-52
|
|
ШК4GN50K-70-601500
|
1,430
|
70
|
60
|
150
|
1,63 0
|
67-82
|
|
|
|
|
|
|
|
|
|
|
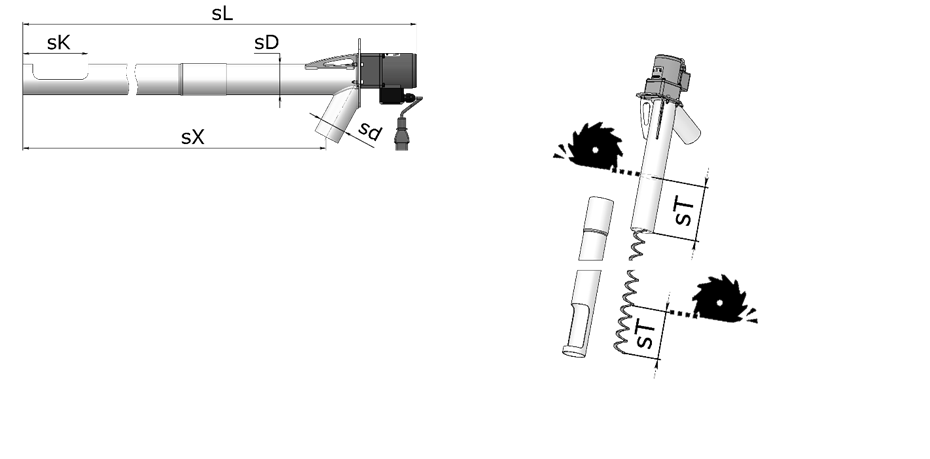 The burner is supplied as standard complete with a 1.5 m long fuel spiral conveyer. Fuel spiral conveyers of different lengths are optionally available. At that, the design of any spiral conveyer enables reduction of its length in site
Fig. 3 Fuel Spiral Conveyer Standard Sizes
during the burner installation, which provides for the boiler room ergonomics.
To reduce the length of the fuel spiral conveyer, its final length must be calculated.
For example, if for the proper installation of the burner a 1.2 m long spiral conveyer (size sX) is required up to the discharge opening, it means that the Fig. 4 Reduction of the Fuel Spiral
standard spiral conveyer is not acceptable. Conveyer Length
This means that the spiral conveyer must be shortened by 230 mm. To do so, tighten the main spiral conveyer pipe with the feed block opening following the instructions in Fig. 4. The spiral conveyer is telescopic jointed. Then, using the cut-off wheel of the angle grinder, remove part of the scroll and the upper pipe of the spiral conveyer with a length of sT.
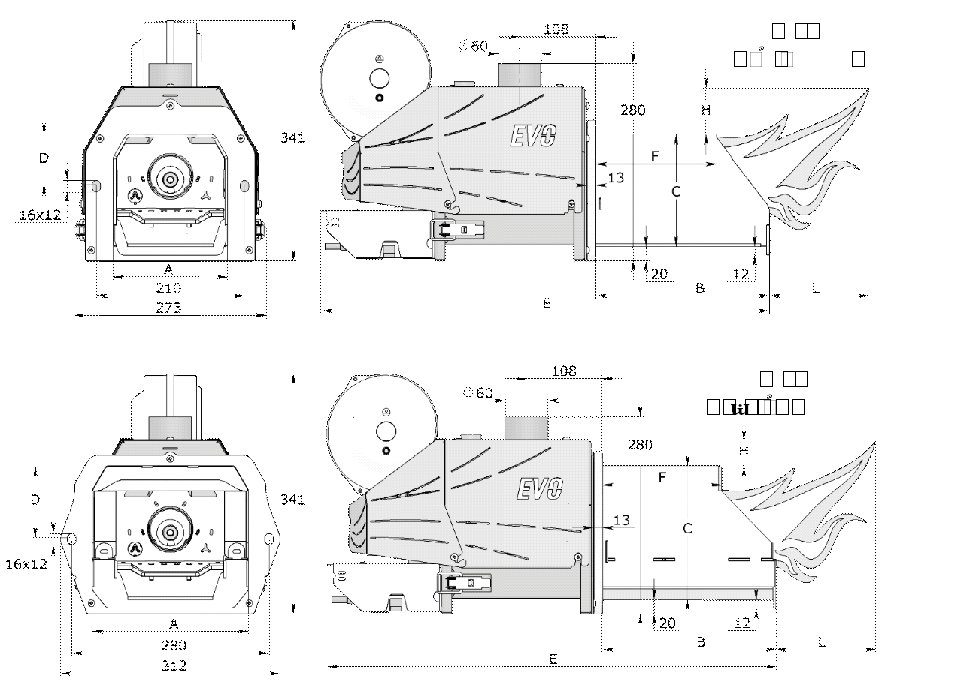
6. Overall and Mounting Dimensions of the EVO Model Range
|
Model
|
Capacity, kW
|
A
|
B
|
C
|
D
|
E
|
F
|
H
|
L
|
|
EA140
|
18
|
142
|
213
|
139
|
52
|
601
|
133
|
100
|
200
|
|
EB140
|
26
|
142
|
213
|
139
|
52
|
601
|
167
|
130
|
260
|
|
EA160
|
37
|
162
|
246
|
160
|
72
|
636
|
171
|
160
|
320
|
|
EB160
|
52
|
162
|
246
|
160
|
72
|
636
|
260
|
190
|
380
|
|
EA180
|
67
|
182
|
281
|
180
|
92
|
671
|
212
|
220
|
440
|
|
EB180
|
82
|
182
|
281
|
180
|
92
|
671
|
247
|
250
|
500
|
|
EAC140
|
18
|
201
|
211
|
169
|
82
|
601
|
127
|
100
|
200
|
|
EBC140
|
26
|
201
|
211
|
169
|
82
|
601
|
162
|
130
|
260
|
|
EAC160
|
37
|
221
|
246
|
190
|
102
|
636
|
169
|
160
|
320
|
|
EBC160
|
52
|
221
|
246
|
190
|
102
|
636
|
204
|
190
|
380
|
|
EAC180
|
67
|
241
|
281
|
210
|
122
|
671
|
209
|
220
|
440
|
|
EBC180
|
82
|
241
|
281
|
210
|
122
|
671
|
244
|
250
|
500
|
when used as intended. As a rule, EVO series burner is installed in an
7. The Burner Installation
assembled boiler room on the boilers operating on solid
The best result in the burner operation is achieved fuel with performance specifications corresponding to the
parameters of the burner.
Depending on the boiler design, several options are provided for installing the burner in the boiler combustion chamber. Cutting in to the lower boiler door is the most popular installation method.
The burner must be located so that the burner maintenance is not complicated and its main components are accessible. Easy cleaning and direct control of the combustion chamber must be ensured.
In case the burner is installed in the boiler door that opens, the burner structural components must not reach the boiler surfaces (the burner must not cling to the boiler when the door opens). If the door width is too narrow, asymmetrical installation of the burner combustion chamber in the door, closer to the door rotation hinges, is acceptable. If the burner still abuts against the side frame of the door opening even with the specified arrangement, a remote-mount flange must be used to extend the burner outward from the boiler combustion chamber. For the latter case, making a new boiler door specifically to install the burner, while retaining the old one, would be recommended: this will enable quick enough switching to wood heating at any time. Please consult the manufacturer technician to determine the best solution for installing the burner in a particular boiler.
A pellet hopper of a certain capacity must be provided in the boiler room to enable the burner to operate for a significant period of time, during which it can be kept unattended. The hopper must be suitable for a fuel spiral conveyer with a diameter of 70 mm. Such a hopper in an assortment of varieties can be purchased from the burner manufacturer, or an existing hopper made of noncombustible materials can be used.
Particular attention must be paid to the spiral conveyer intake opening at the bottom. While in operation, the feeding screw must be completely covered with pellet and protected from contact with the personnel. A rotating screw can cause serious injury.
The burner must only be installed by specialized certified personnel and in compliance with the instructions specified in this Service Manual.
Standard Installation Procedure:
- Measure the boiler doors and determine the optimum burner attachment point and the need for a remote-mount flange. The burner must be installed in the boiler in accordance with the dimensions and location described in the installation lay-out (Fig. 5).
- In case the delivery package is not provided with an additional boiler door for the burner, provide a hole for the burner combustion chamber and fixing holes to fix the burner to the boiler door (refer to Section 6). If the door requires installation of a remote-mount flange, it must be installed by a qualified technician and in accordance with the instructions specified in this Manual.
A smoke pump must be installed for the boiler lacking sufficient vacuum (less than 20 Pa).
- Remove the burner elbow. Then install the burner in the door opening attached to the boiler and secure it by tightening the screws. Make sure the burner door opens and closes freely. The burner combustion chamber and the boiler ash pan must be freely accessible.
- Install the automation unit either on vertical or horizontal panel, depending on the selected electrical connection option, so that it is easy to monitor the information display and manipulate the control unit actuators.
- Insert the length-adjusted fuel spiral conveyer (refer to Section 5) into the empty pellet hopper. When the hopper is already loaded with pellet grains, the spiral conveyer can be inserted into the hopper mounting bore using sufficient force along the mounting axis while rotating the spiral conveyer in its helix direction, as if "screwing" it into the pellet. The intake opening must be completely covered with pellets, and no gaps, through which the pellet grains could drop out during the spiral conveyer operation, must remain between the spiral conveyer pipe and the hopper mounting bore.
- Install the burner elbow in the corresponding nozzle of the burner feeder. Adjust the length of the fusible corrugated hose connecting the fuel spiral conveyer and the burner elbow so that it does not interfere with the free opening of the boiler door with the burner installed. With that, the hose axis and the horizon must form an angle of more than 35 degrees for the free flow of pellet grains without formation of clogs, which will cause an emergency shutdown.
- Plug all electrical connections according to the selected wiring diagram. In the most basic version, the head multi-core cord of the controller must be connected to the plug on the burner housing or, if not provided, to the connector of the burner switching unit; the overheating sensor must be installed in the feeder sleeve through manhole 15 Fig. 2. The boiler sensor must be installed in the boiler temperature protection sleeve or, if not provided, securely attached to the boiler feed pipe; the fuel spiral conveyer connection cord must be securely installed in the automation unit connector; all connections must be checked for reliability; wires are ergonomically routed around the furnace room; grounding connection must be checked; igniter connection and correct seating must be checked.
Close the plastic cover of the switching unit in case
it was opened during the installation.
- Connect the controller power cord to a grounded outlet and turn the controller switch on. A message with the controller firmware version will be displayed.
- Run a service “check of the outputs” of the controller by visual inspection of the burner assemblies in accordance with the automatic system Manual.
- Fill the pellet grains into the fuel hopper so that they cover the intake opening of the spiral conveyer if no pellet is available in the hopper. Press and hold the controller “START” button for 5 seconds; the “spiral conveyer filling” mode will be activated.
Simultaneously, the scroll of the fuel spiral conveyer will start rotation involving pellet grains into the intake opening. If the corrugated hose is connected to the burner elbow, disconnect them by lowering the end of the hose into a dry container with a capacity of 5 to 10 liters. In 3-10 minutes after activation of the spiral conveyer, the pipe will be filled with pellet grains, and they will start falling out of the discharge opening into the container. Wait about 1 minute to ensure that the spiral conveyer is filled. Press the controller “STOP” button, pellet grains feeding will stop.
- Batch weight the fuel. To do so, a small container of about 5 liters or a sturdy bag of 10 liters and a timing device are needed.
Calculate the hourly capacity of the spiral conveyer in kilograms (kg/h) using the check weighing method. To do this, switch to the “spiral conveyer filling” mode having previously directed the spiral conveyer hose into the prepared empty container, as well as mark the time with the timing device.
For example, 826 grams of pellet grains were filled into the container after 2 minutes. Taking into account the caloric content of the pellet grains specified in the delivery certificate (for example, 4,100 kcal/kg) calculate the hourly capacity of the spiral conveyer into kilowatts (kW) using the following formula:
kg/hour (spiral conveyer) * kcal (pellet grains) *
0.001163 = kW
In this case, 0.826 kg in 2 minutes = 24.78(kg/h), then: 24.78(kg/h)*4,100(kcal/kg)*0.001163 = = 118.2 (kW).
This means that with the continuous operation of the spiral conveyer, it will ensure operation of 118 kW burner.
Take the hourly capacity of the spiral conveyer for 100% and calculate the fuel weight for maximum and minimum burner capacity as a percentage. To put it simply, calculate how many percent of the time a spiral conveyer should rotate in order to fill the pellet for a certain capacity.
Assuming the installed burner is 37 kW, for which
the minimum capacity amounts to 12 kW (Table of Section 5), then in this example: (37 kW/118 kw=0.31) “Fuel Dose for Max Capacity” = 31%; (12 kW / 118 kW=0.1) “Fuel Dose for Min Capacity” = 10%
- Connect the corrugated hose to the burner elbow. After additional service configuration, the burner is ready to be started.
Attention! The burner combustion chamber must be installed with the grate bar grass in a horizontal position. The burner/boiler connection must be tight to avoid any leakage of the smoke fumes. The use of a gas analyzer is recommended for configuring the burner.
8. Electrical Schematic Diagram
Technical Data of the Automation Controller
|
Parameter
|
Value
|
|
Power supply
|
230 V ± 10%, 50
Hz
|
|
Power consumption (excluding fan and pump)
|
<2 VA
|
|
Temperature measuring range (KTY 81-210)
|
- 9 ÷ 109°C ± 1°C
|
|
Burner temperature measuring
|
- 9 ÷ 109°C ± 1°C
|
|
range (KTY 81-210)
|
|
|
Burner temperature measuring range (RT-1000)
|
- 30 ÷ 500°C ± 3°C
|
|
Boiler temperature control range
|
30 ÷ 90°C ± 1°C
|
|
Software protection of the boiler overheating
|
90 ÷ 99°C ± 1°C
|
|
Hardware protection of the boiler overheating
|
>95°C ± 1°C
|
|
Aggregate output load
|
max. 2 A / 230 V
|
|
x General
|
|
Parameter No.
|
Value
|
|
2.1 Language
|
Russian
|
|
2.7 Outputs testing
|
*1
|
|
3. x Fan 1 operation parameters
|
|
|
3.1 Speed modulation at ignition
|
NO
|
|
3.5 Fan speed at ignition
|
6%
|
|
3.6 Speed at max capacity
|
20%
|
|
3.7 Speed at min capacity
|
7%
|
|
3.8 Attenuation speed
|
100%
|
|
3.10 Fan blowing.
|
YES
|
|
3.11 Blowing time
|
s
|
|
3.12 Blowing interruption time
|
min
|
|
3.13 Blowing speed
|
100%
|
|
4.x Fuel hopper parameters
|
|
|
4.1 Hopper filling time
|
min *2
|
|
4.2 Starting fuel dosage
|
s
|
|
4.3 Fuel feeding cycle
|
s *3
|
|
4.4 Fuel dosage for ignition
|
0% *4
|
|
4.5 Fuel dosage for max. capacity
|
X%*5
|
|
4.6 Fuel dosage for min. capacity
|
Y%*5
|
|
4.7 Stoker operation mode
|
AUTO
|
|
4.10 Stoker extra operation time
|
*6
|
|
4.11 Stoker cleaning time
|
s
|
|
4.12 Hopper ignition
|
YES
|
|
4.13 Hopper ignition temperature
|
80o
|
|
5. x Spark lighter operation par
|
ameters
|
|
5.5 Flame loss delay.
|
s
|
|
5.6 Fuel ignition time.
|
min*7
|
|
5.7 Number of ignitions
|
*8
|
|
5.10 Ignition stabilization
|
YES
|
|
5.11 Ignition stabilization time
|
min
|
|
5.13 Combustion chamber attenuation time
|
min
|
|
x Cleaning mechanism
|
|
|
6.1 Combustion chamber cleaning
|
C
|
|
6.2 Cleaning mechanism operating time.
|
s
|
|
6.3 Cleaning mechanism release time.
|
s
|
|
6.4 Cleaning mechanism downtime.
|
s *9
|
|
x Boiler operation parameters
|
|
9.1 Minimum boiler temperature.
|
30o *10
|
|
9.2 Maximum boiler temperature.
|
90o *10
|
|
9.6 Boiler overheat temperature.
|
o *10
|
9. Manufacturer Settings. Basic parameters
Automation settings specified in the Table are well suited for the burner initial start-up, and are averaged for most OXI EVO series burners. However, these parameter values cannot be considered optimal. Please note that the final settings for this particular burner will not correspond to the specified ones, and their values will be clarified in the process of the burner setup by a technician.
Only the basic parameters of the controller, without which settings the start-up is not possible, are presented in the Table. For a complete list of parameters, refer to RK-2006SPG2 Controller
Manual. The titles of some items may differ due to the differences in menu translation in different versions of the controller firmware.
Notes
|
*1
|
The menu is used during the burner installation or maintenance; see Section 7 “Burner Installation” Clause No. 9.
|
|
*2
|
The parameter is used during the burner installation or maintenance when the “spiral conveyer filling” mode is activated; see Section 7 “Burner Installation” Clause No. 10-11.
|
|
*3
|
Burners operating experience suggests the parameter value of 30 seconds or more for high quality pellets. It can be useful to reduce the cycle time value to 15 seconds for agro pellets. The final decision will be made during the burner configuration.
|
|
*4
|
Burner operating experience suggests that feeding pellet grains is not always advantageous during the ignition. The new batch often shifts the location of the ignitable pellet grains thereby deteriorating the ignition and extending its time. 0% – no fuel is fed during the ignition.
|
|
*5
|
The parameters percentage values are determined by the spiral conveyer batch weight, its hourly capacity. See Section 7 “Burner Installation” Clause No. 11. In case of change of the spiral conveyer position or fuel grade, the hourly capacity of the spiral conveyer must be recalculated. After that, the parameter values must be updated.
|
|
*6
|
This is an extra time to ensure that the pellet grains, which are lagging behind falling through the corrugated hose after the cyclic shutdown of the fuel spiral conveyer, are fed into the combustion chamber from the feeder. 5-10 seconds is an acceptable value, but note that this time in seconds must not be longer than the fuel spiral conveyer downtime, since the feeder will then run continuously. In this case, overheating of the latter is probable.
The acceptable value can be calculated using the following formula:
|
|
|
(4.3 Fuel feeding cycle, sec) * (100%-(4.5 Fuel dosage for max. capacity, %)) /100%
Assume,
“4.3 Fuel feeding cycle” = 30 sec
“4.5 Fuel dosage for max. capacity” = 34% Then:
30 (sec)*(100%-34%)/100 = 19.8 (sec).
It would be reasonable to choose:
“4.10 Stoker extra operation time” = 10 sec, leaving 9.8 seconds of the feeder downtime for cooling.
|
|
*7
|
Operating experience suggests:
Ignition < 2 min – excellent.
Ignition < 5 min – good.
Ignition < 7 min – acceptable.
Ignition < 15 min – requires setting of “3.5 Fan speed at ignition” parameter, as well as testing the spark lighter setting and fuel quality
|
|
*8
|
Operating experience suggests that if the burner is not ignited in 2 ignitions, the causes of unstable ignition must be identified and measures to improve the ignition must be taken.
|
|
*9
|
The cleaning mechanism operation frequency must be selected experimentally for the specific fuel. Operating experience suggests that “6.4 Cleaning mechanism downtime” = 120 sec is appropriate for operating the burner with medium quality fuel (that is, wood pellet with ash content of 2-7%). For agro pellets, the downtime must be reduced up to 1 sec (these include dusty sunflower pellet grains with ash content of 25%). In the case of high-quality ENplus pellets the cleaning can be completely disabled: “6.1 Combustion chamber cleaning” = NO
|
|
*10
|
The coolant control temperatures in the heating circuit are set depending on the heating system type. The specified parameters are appropriate for the initial start-up and brief operation of the burner.
|
- The burner must only be installed and configured by specialized certified personnel and in compliance with the instructions specified in this Service Manual.
- Do not permit inexperienced persons or children to open the burner.
- Read RK-2006SPG2 Controller User Manual before the burner initial start-up.
10. Start-up and Shutdown
- Make sure pellet grains are available in the hopper. Start the water pump if available.
- Activate the burner automation system. The burner will switch to the standby mode.
- In the standby mode, change of the burner basic settings, as well as control of the burner main components availability in the diagnostics menu, are enabled. (Section 7 Clause 9 and Section 9 Clause 2.7 Outputs testing).
- Before the burner initial start-up, as well as after each preventive cleaning of the spiral conveyer, the spiral conveyer pipe must be filled with pellets. Refer to description in Section 7, Clauses 10-11.
- Check the following user menu parameters when starting the burner for the first time:
|
Parameter
|
Value
|
|
1
|
PELLETS
|
|
2
|
60o-90o
|
|
3
|
~5-20
|
- To start the burner, select the “START” command by pressing the “START” button. A brief sound from the fan blowing should be heard. After that, the pellets will be unloaded into the intake combustion throat of the burner elbow through the corrugated hose with subsequent feeding of the pellets into the burner combustion chamber. The igniter and the pressurizer fan will be activated in a short time.
- Once the start-up is successful, the automatics system will indicate the appearance of the flame with a corresponding increase in brightness in the burner combustion chamber. The main parameters of the burner operation are also displayed on the screen.
- FUEL TYPE → WOOD/PELL.
- SET TEMPERATURE
- OFF IGNITION AT BRIGHTNESS
- CURRENT FLAME BRIGHTNESS
- The burner shutdown occurs in the following cases:
- the ”STOP” button is pressed on the control panel; - unsuccessful series of ignition attempts, if the specified flame brightness was not set;
- the set temperature of the burner elbow is exceeded (see Section 9 Clause 4. 13 “Hopper ignition temperature”);
- Upon receiving the shutdown command, the automation system will proceed to the following program:
- the spiral conveyer drive is disabled and the pellets feeding into the burner is stopped;
- the burner is switched to the combustion chamber blowing mode for the preset period of time (see Section 9 Clause 5.13 “Combustion chamber attenuation time”), after which it is switched to the standby mode.
11. Main Operating Modes
The burner operation with different types and grades of fuel may require changes in the controller settings. For this purpose, 4 different settings profiles for different fuels can be set in the controller. The settings profiles are saved in the user menu under the name “Fuel Type 1-4”. When changing the pellets, the appropriate settings profile must be selected in the “Fuel Type” menu section.
Once all the instructions in Section 10 have been completed, the burner can be operated in a continuous mode. Uninterrupted operation is achieved with availability of fuel in the pellet hopper and proper operation of the heating system. When the pellet burner is operated by the KEY controller, the following operating and emergency statuses of the burner are probable:
|
MAX. CAPACITY
|
Constant fuel and air supply with controlled temperature rise dynamics at the constant burner capacity.
|
|
Preventive smooth reduction of fuel and air supply, and hence the burner capacity in order to raCAPACITY MODULATIONise the boiler temperature to the set value without its exceeding, and maintaining of the heating system in a given temperature range.
The modulation primary objective is to reduce the number of ignitions and attenuations by varying the burner capacity.
|
|
MINIMUM CAPACITY
|
Constant fuel and air supply to maintain combustion without increasing the temperature.
|
|
BLOWING
|
Removal of clogging by shortterm increase of the fan capacity up to 100% (see Section 9
Clauses 3.10-3.11)
|
|
AFTER COMBUSTION
|
Before switching to the ATTENUATION mode, the residual fuel is slowly after combusted until its all-burnt condition.
|
|
ATTENUATION
|
The constant blowing down mode is activated to cool the burner structure in the absence of flame (see Section 9 Clause 5.13).
|
|
FILLING
|
The spiral conveyer filling mode. The burner is disabled at this moment (see Section 9
Clause 4.1).
|
|
ALARM SIGNALS
|
Information about the problem is displayed on the screen. Additionally, depending on the fault type, the internal buzzer may also be activated. See Section 12 for more information.
|
|
Status
|
Description
|
|
STOP
|
The boiler control is disabled. Pumps operation control is enabled, but temperature-
controlled automatic ignition is not activated.
|
|
STANDBY
|
Pumps operation control is enabled. Upon reaching the min temperature, automatic ignition is activated.
|
|
IGNITION
|
The burner automatic ignition.
|
|
IGNITION STABILIZATION
|
Smooth increase of fuel and air supply until MAXIMUM
CAPACITY mode is reached.
|
12. Basic Arising Problems
Problems Caused by Installation Errors:
|
No.
|
Problem
|
|
A.
|
Automation system can be damaged by flames and smoke when the boiler door is opened. The automation system location is inconvenient for monitoring and control.
|
|
B.
|
The automation system is conveniently installed for monitoring, but will be damaged during the pellet grains loading from the bag into the hopper.
|
|
C.
|
The automation system is installed inconveniently for monitoring and may be damaged by the hopper cover.
|
|
D.
|
Poor sealing between the burner and the door.
Gases penetrate into the combustion chamber.
|
|
E.
|
The spiral conveyer is installed not deep and tightly enough in the hopper, the pellet grains spill.
|
|
F.
|
Improperly selected relative location of the hopper and the door opening angle. The corrugated hose is stretched.
|
|
G.
|
Insufficient inclination angle of the corrugated hose. It is clogged with dust and pellet grains.
|
|
No.
|
Failure
|
Reason
|
Solution
|
|
1.
|
The burner is not ignited.
Alarm signal: “No fuel”
5
|
• Pellet hopper ran out of pellet grains.
|
• Fill the hopper with pellets.
• Restart the automation system.
• Fill the spiral conveyer.
|
|
• The fuel spiral conveyer is jammed.
• Failure of the spiral conveyer drive.
|
• Release the spiral conveyer.
• Clean it if necessary.
• Run an outlet test for the spiral conveyer.
• Replace the spiral conveyer if necessary.
• Fill the spiral conveyer.
|
|
• The spark lighter is either burned out or no electrical contact.
|
• Run an outlets test for the spark lighter.
• Visually check the heating element glow.
• Replace the spark lighter if necessary.
• Make sure it is correctly installed in the sleeve and free of clogging.
|
|
• Failure of the feeder drive.
(the corrugated hose is completely filled with pellet grains)
|
• Run an outlets test for the feeder.
• Replace the feeder if necessary.
|
|
• Combustion chamber slagging.
• The boiler ash pan is filled to the level of the burner combustion chamber.
|
• Clean the combustion chamber.
• Clean the boiler ash pan.
|
|
• The photo sensor photosensitive element is damaged or dirty.
|
• Check the increase of the CURRENT FLAME BRIGHTNESS by lighting a
flashlight into the combustion chamber.
• Clean the photosensitive element or replace the photo sensor if necessary.
|
|
2.
|
Message: "Hopper
Ignition"
6
|
• The burner housing is too hot due to improper operation.
|
• Eliminate any defects causing the housing to be heated.
|
|
• The back draft dampener is not completely closed causing hot gases draft into the fuel pipe.
|
• Fix the breakage of the back draft dampener or clean it.
|
|
• Considerable decrease in the boiler discharge, the boiler is probably dirty.
|
• Check the draft, clean the boiler.
|
|
• Due to the seasonal changes in the Sun trajectory, its light heats the burner housing through the furnace room window.
|
• Use non-flammable curtains on the window.
|
|
• The boiler ash pan is filled to the level of the burner combustion chamber.
|
• Clean the boiler ash pan.
|
|
3.
|
Message:
"Boiler Overheating"
7
|
• Maximum boiler temperature is exceeded
|
• Wait for the temperature to decrease.
• Use capacity modulation.
|
|
• The boiler preset temperature is too low.
|
• Change the preset temperature settings.
|
|
• The forced circulation of the coolant through the boiler has
|
• Turn on the pump, it may have failed.
• Be sure to troubleshoot the overheating
|
5. Alarm: No fuel
6. Alarm: Hopper Ignition
7. Alarm: Boiler Overheating
|
|
|
stopped.
|
reason.
|
|
4.
|
The AFTER
COMBUSTION mode is
not changed into
ATTENUATION mode.
|
• The photo sensor contact is damaged.
|
• Replace the photo sensor.
|
|
5.
|
The burner excessively smokes.
|
• Not enough air for combustion.
|
• Add combustion air, configure the burner.
|
|
• The fan is damaged.
|
• Run the fan output test, inspection.
Replacement.
|
|
• The fan inlet is blocked.
|
• Release the inlet from the blockage.
|
|
6.
|
Excessive ash. Unburned pellets are observed.
|
• Poor quality pellet.
• The cleaning mechanism is damaged, or the movable grate bar is jammed.
• The cleaning drive is unlocked with a magnetic key fob, see Fig. 10.
|
• Change the pellet supplier.
• Run an output test for the cleaning mechanism. Clean and inspect.
• Remove the magnetic key fob.
|
Any manipulations with the burner components, fuel spiral conveyer or automation system must be performed with the de-energized and cooled down burner. Non-compliance with safety precautions can result in serious
injury.
13. Requirements for the Safe Operation
The pellet burner is a high power heat device; to ensure safe operation of the burner the basic rules of its operation must be observed.
- Do not open the boiler door with the burner installed during the operation of the burner.
- In case of pellet grains or dust ignition on the burner surface, immediately disconnect it from the power supply network before extinguishing the fire with appropriate means.
- The boiler room must be kept clean, ensure no flammable materials are stored in the furnace room. 4. The burner must be operated by the qualified personnel who have been instructed and have read the User Manual.
- The boiler, heaters and DHW components must be kept in proper operating condition.
- Note particularly the moisture sources located near the burner. Contact of the burner construction components with water considerably increases the risk of electric shock.
- The burner feeder and the fuel spiral conveyer are equipped with rotating components and drives of significant power. Keep your fingers and other objects out of the rotation area to the maximum extent possible.
- Modification of the burner design or installation of any electrical consumers not provided by the Manufacturer and their connection to the burner electrical diagram is strongly prohibited.
- The burner is a high heat emitting device; some burner components operate at a high temperature. For example, the combustion chamber ceramic coating can be heated up to 1,200°C. Be careful when handling the burner.
- No operation of the burner is permitted unless the installation has been approved by an authorized service technician.
- Installation and operation of the burner in the boilers that are not appropriate is prohibited.
- The burner cannot function as an open flame source.
- Do not leave any objects on the burner surfaces.
- Do not use other ignition methods, in particular, flammable liquids.
- The burner must be operated with the cover installed. All sensors must be installed in their original positions at all times while the burner is in operation.
Please note that only reasonable use of the equipment can be safe. All potential emergency situations cannot be anticipated.
14. Maintenance. Burner Checkout
The burner must be cooled down before any maintenance operations. The burner must be disconnected from the power supply network.
General Recommendations
To ensure the burner uninterrupted operation and to maximize the burner service life, the following guidelines must be observed:
- Clean the combustion chamber regularly. The frequency of cleaning depends on the fuel quality, its ash content and humidity, as well as on the operating mode of the movable grate bar. On average, such cleaning is required once a week.
- Use high-quality certified fuel.
- Do not allow fuel containing impurities to be combusted in the burner. Use only wood and agro pellets. Beware of woodworking pellet grains, particleboard contains poisonous toxic substances.
- The boiler room must provide sufficient air supply and ventilation.
Air Distribution Control.
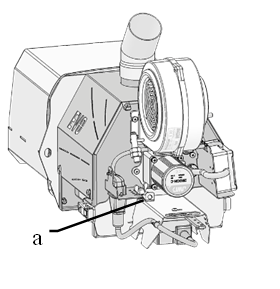 Greater combustion process efficiency can be achieved by proper distribution of secondary and primary combustion air of the burner. OXI EVO series pellet burner is equipped with an independent pressure reduction system, which enables fine control of the air supply and distribution in the burner combustion chamber. The distribution valve control lever is located next to the grate bars drive
connector (Fig. 7, a)
If more air is required under the
movable grate bar grass, the lever Fig. Fig.7 Air Control Lever
8 is shifted along the bar to position 1. If
more air is required for complete combustion of the volatiles, then more air is supplied through the front wall, and the levers are shifted to position 2.
Fix the lever in the desired position by turning, Fig. 8.
Replacing the Spark Lighter
The igniting unit may be replaced by a service representative of the manufacturer, or by a qualified person instructed and authorized to work with voltages of up to 1 kW.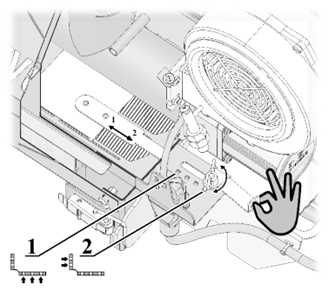
- De-energize the cooled burner.
- Remove the cover of the switching unit A 9 and disconnect the spark lighter terminal (FIRE).
- Remove the screws b 9.
- Remove the spark lighter cover c in such a way as to fully open the opening. Loosen the spark lighter locking screw v.
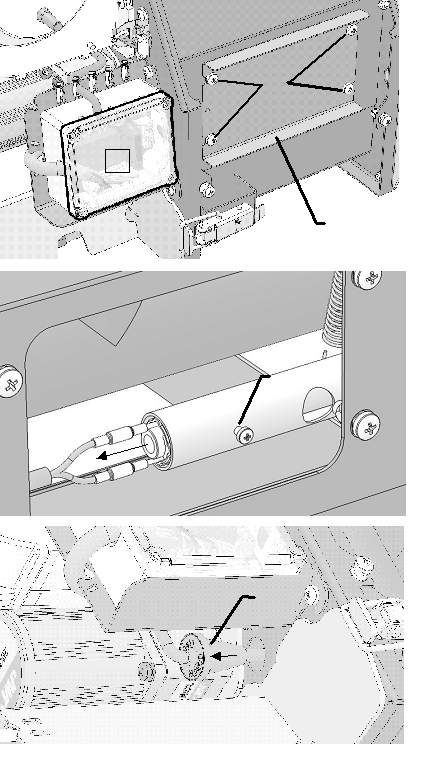 Fig. 8 Air Distribution Valve Lever.
- Pull the spark lighter by the wire along its axis without much effort until the sealed lead-in G is out of its mounting bore.
- Install the spark lighter in the reverse order. The spark lighter must fit tightly in the burner mounting sleeve and reach the end.
Fig. 9 Replacing the Spark Lighter
Cleaning the Under-Grate Bars Area.
To dismantle the grate bars, de-energize the cooled burner.
Remove the ash from the grate bars surface with a special brush into a pre-prepared non-flammable container or into the boiler ash pan.
Shift the cleaning rod to the rear position. To do so, press and hold the locking button M Fig. 10, now the drive can be freely manually moved. Pull the drive rail K, bringing it to the extreme rear position. 
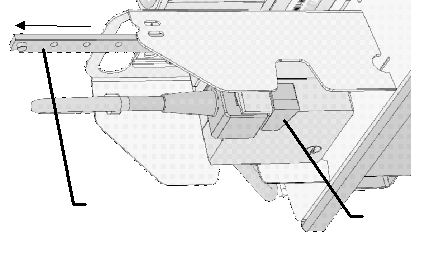
Then, disconnect the grate bars drive connector T and unfasten the safety locks F on the both sides Fig. 11. Now pull the grate bars assembly by the handle P until the grate assembly is completely out of the burner.
Clean the burner combustion chamber by removing all ash and slag. Install the grate bars assembly in the reverse
Fig. 10 Unlocking the Cleaning Drive
Fig. 11 Dismantling of the Grate Bars order.
15. Disposal of the Burner at the End of its Service Life
Burners that have become unserviceable due to improper operation, accidents or due to expiry of their service life must be subject to disposal. The burners contain no materials or components hazardous to the environment and are subject to disposal in accordance with the general procedures adopted by the Company or in accordance with General Environmental Regulations.


